Spring Boot自动装配原理解析及自定义Starter开发指南 在使用Springboot做项目的时候,你是否好奇,为什么项目里只要引入了那些starter为后缀命名的依赖,spring容器中就自动配置了这些依赖中的实现类,你只需要注入即可。比如RedisTemplate、RabbitTemplate等。你是否想自己也实现一个springboot可以自动配置的依赖。那么通过本篇文章,你就可以更加清晰的理解spring的自动装配机制,以及手动实现一个starter依赖。
一、SPI机制 1.1 什么是SPI机制 SPI,字面意思:服务提供者的接口
我的理解是,他是专门提供给服务提供者 去开发的一个接口。SPI将接口的定义和实现分离开来,将两者解耦(放在不同的包)。从而提升程序的可扩展性(支持多种实现)。
举例 很多框架都用到了SPI机制,比如Spring框架、数据库驱动、日志接口等。
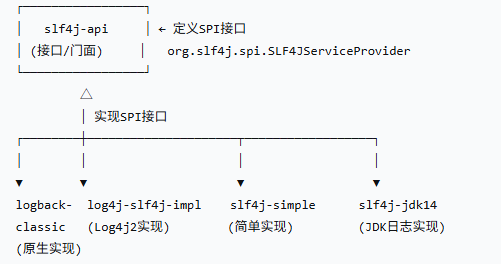
以日志接口举例:slf4j 提供了spi接口,然后有多个实现spi的依赖包可供选择,比如原生的logback 或者其他开发者提供的log4j2 。⭐(这里可以记下,贴合实际,面试有用)
模块
主要职责
是否SPI接口
slf4j-api 提供日志门面API + SPI机制
包含SPI接口定义
logback-classic 日志实现 + SPI服务提供者
SPI实现者
log4j-slf4j-impl 适配器 + SPI服务提供者
SPI实现者
对比API API(Application Programming Interface)跟SPI最大的区别就是,接口的定义和实现是放在同一个包中的,不方便进行扩展。
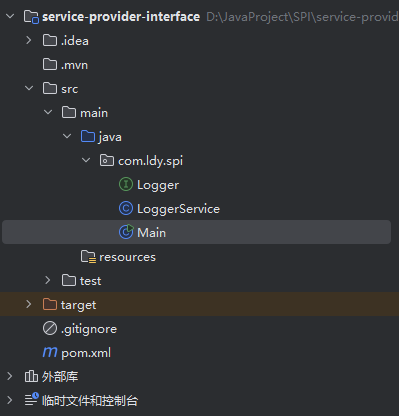
1.2 Java SPI实战演示 1.2.1创建服务提供者的接口jar包 首先,随便创建一个java项目,结构如图所示
Logger是公共接口,而LoggerService是测试SPI接口的类,Main是测试类
Logger
1
2
3
4
public interface Logger { void info (String msg) ; void debug (String msg) ; }
LoggerService
1
2
3
4
5
6
7
8
9
10
11
12
13
14
15
16
17
18
19
20
21
22
23
24
25
26
public class LoggerService { Logger logger; public LoggerService () { ServiceLoader<Logger> loader = ServiceLoader.load(Logger.class); Iterator<Logger> iterator = loader.iterator(); if (iterator.hasNext()){ logger = iterator.next(); } } public void info (String msg) { if (logger == null ){ System.out.println("没有找到logger的实现类" ); return ; } logger.info(msg); } public void debug (String msg) { if (logger == null ){ System.out.println("没有找到logger的实现类" ); return ; } logger.debug(msg); } }
Main
1
2
3
4
5
6
7
public class Main { public static void main (String[] args) { LoggerService service = new LoggerService (); service.info("ldy info" ); service.debug("ldy debug" ); } }
运行main方法,我们会发现控制台会输出
1
2
没有找到logger的实现类 没有找到logger的实现类
这是因为目前serviceLoader没有找到Logger的实现类。
我们打个jar包,然后再创建一个项目来实现Logger接口。
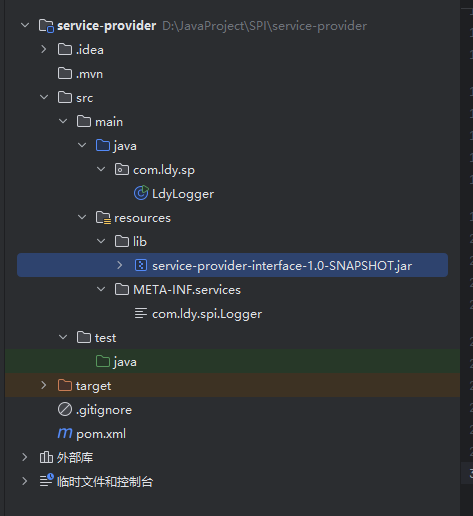
1.2.2创建服务提供者的实现jar包 创建新项目service-provider,将interface的jar包放到resource目录中,并手动右键导入到库中,项目结构如图所示
导入jar包成功之后,编写自己的Logger接口的实现类(任意包名都可以的)。
1
2
3
4
5
6
7
8
9
10
11
12
13
14
15
16
17
public class LdyLogger implements Logger { @Override public void info (String s) { System.out.printf("ldy info %s%n" , s); } @Override public void debug (String s) { System.out.printf("ldy debug %s%n" , s); } public static void main (String[] args) { LoggerService service = new LoggerService (); service.info("这是info日志" ); service.debug("这是debug日志" ); } }
最后,在resource目录的META-INF/services目录下创建名为Logger接口全类名的文件。
文件里面写入我们自己的Logger实现类的全类名。
然后任意写个类,或者直接在实现类中写上main方法,启动并测试LoggerService的info和debug方法。
我的打印结果如下:
1
2
ldy info 这是info日志 ldy debug 这是debug日志
可以看到,LoggerService成功使用我们的自定义的Logger实现类的方法进行了打印。
至此,SPI实战就完成了。但是你一定好奇,为什么在META-INF/service目录下创建对应文件并写入实现类的全类名后,LoggerService的构造方法可以成功将我们自定义的LdyLogger对象赋值给logger成员变量。这其实跟ServiceLoader脱不开关系,他也是SPI机制实现的关键。
1.2.3原理探究 Java中的SPI机制采用懒加载 的方式,其实就是在每次调用ServiceLoader的load()方法产生的不同接口的(同一个接口会复用已有的结果) ServiceLoader实例对象的iterator()方法的时候,会先去找到class相对目录下的META-INF/services文件夹下的文件,将这个文件夹下面的{接口全限定名}文件加载到内存中 ,找到相应接口的具体实现类,找到类之后,就可以通过 反射去生成对应的对象,保存到一个list集合中,所以可以通过迭代或者遍历的方式拿到对应接口的实现实例对象。
看ServiceLoader的load()和iterator()方法上面的注释即可知道ServiceLoader采用的就是懒加载的方式。
注意: 针对同一个接口class的多个ServiceLoader,除了第一个以外,之后他们的获取到的实现类的对象是复用的。
不是每次调用 iterator() 都重新查找 :
1
2
3
4
5
6
7
8
ServiceLoader<MyInterface> loader = ServiceLoader.load(MyInterface.class); Iterator<MyInterface> it1 = loader.iterator(); Iterator<MyInterface> it2 = loader.iterator();
测试代码:
1
2
3
4
5
6
7
8
9
10
11
12
13
14
public static void main (String[] args) throws NoSuchFieldException, IllegalAccessException { LoggerService service = new LoggerService (); Field logger = service.getClass().getDeclaredField("logger" ); logger.setAccessible(true ); Object o = logger.get(service); LoggerService service2 = new LoggerService (); Field logger2 = service2.getClass().getDeclaredField("logger" ); logger2.setAccessible(true ); Object o2 = logger2.get(service); System.out.println(o2 == o); }
1.3 ServiceLoader源码解析 本人的知识点欠缺部分:java的模块化 知识点。
load(Class<S> service) ServiceLoader.load()方法用于获取ServiceLoader的实例
1
2
3
4
5
6
public static <S> ServiceLoader<S> load (Class<S> service) { ClassLoader cl = Thread.currentThread().getContextClassLoader(); return new ServiceLoader <>(Reflection.getCallerClass(), service, cl); }
ServiceLoader(Class<?> caller, Class<S> svc, ClassLoader cl)
1 2 3 4 5 6 7 8 9 10 11 12 13 14 15 16 17 18 19 20 21 22 23 24 25 26 27 28 29 30 31 32 33 34 35 36 37 38 39 private ServiceLoader (Class<?> caller, Class<S> svc, ClassLoader cl) { Objects.requireNonNull(svc); if (VM.isBooted()) { checkCaller(caller, svc); if (cl == null ) { cl = ClassLoader.getSystemClassLoader(); } } else { Module callerModule = caller.getModule(); Module base = Object.class.getModule(); Module svcModule = svc.getModule(); if (callerModule != base || svcModule != base) { fail(svc, "not accessible to " + callerModule + " during VM init" ); } cl = null ; } this .service = svc; this .serviceName = svc.getName(); this .layer = null ; this .loader = cl; this .acc = (System.getSecurityManager() != null ) ? AccessController.getContext() : null ; }
iterator() iterator()用于返回一个懒惰的 加载并实例化服务的可用提供者的迭代器
真正的加载并实例化位于
1
2
3
4
5
6
7
8
9
10
11
12
13
14
15
16
17
18
19
20
21
22
23
24
25
26
27
28
29
30
31
32
33
34
35
36
37
38
39
40
41
42
43
44
45
46
47
48
49
50
51
52
public Iterator<S> iterator () { if (lookupIterator1 == null ) { lookupIterator1 = newLookupIterator(); } return new Iterator <S>() { final int expectedReloadCount = ServiceLoader.this .reloadCount; int index; private void checkReloadCount () { if (ServiceLoader.this .reloadCount != expectedReloadCount) throw new ConcurrentModificationException (); } @Override public boolean hasNext () { checkReloadCount(); if (index < instantiatedProviders.size()) return true ; return lookupIterator1.hasNext(); } @Override public S next () { checkReloadCount(); S next; if (index < instantiatedProviders.size()) { next = instantiatedProviders.get(index); } else { next = lookupIterator1.next().get(); instantiatedProviders.add(next); } index++; return next; } }; }
newLookupIterator()
这里面利用了策略模式,根据layer是否为null,创建并返回不同策略的迭代器
1 2 3 4 5 6 7 8 9 10 11 12 13 14 15 16 17 18 19 20 21 22 23 24 25 26 27 28 29 30 private Iterator<Provider<S>> newLookupIterator () { assert layer == null || loader == null ; if (layer != null ) { return new LayerLookupIterator <>(); } else { Iterator<Provider<S>> first = new ModuleServicesLookupIterator <>(); Iterator<Provider<S>> second = new LazyClassPathLookupIterator <>(); return new Iterator <Provider<S>>() { @Override public boolean hasNext () { return (first.hasNext() || second.hasNext()); } @Override public Provider<S> next () { if (first.hasNext()) { return first.next(); } else if (second.hasNext()) { return second.next(); } else { throw new NoSuchElementException (); } } }; } }
LazyClassPathLookupIterator
这是传统的通过类路径加载服务提供者的迭代器,我们的spi实战就是利用这个迭代器实现的。
1
2
3
4
5
6
7
8
9
10
11
12
13
14
15
16
17
18
19
20
21
22
23
24
25
26
27
28
29
30
31
32
33
34
35
36
37
38
39
40
41
42
43
44
45
46
47
48
49
50
51
52
53
54
55
56
57
58
59
60
61
62
63
64
65
66
67
68
69
70
71
72
73
74
75
76
77
78
79
80
81
82
83
84
85
86
87
88
89
90
91
92
93
94
95
96
97
98
99
100
101
102
103
104
105
106
107
108
109
110
111
112
113
114
115
116
117
118
119
120
121
122
123
124
125
126
127
128
129
130
131
132
133
134
135
136
137
138
139
140
141
142
143
144
145
146
147
148
149
150
151
152
153
154
155
156
157
158
159
160
161
162
163
164
165
166
167
168
169
170
171
172
173
174
175
176
177
178
179
180
181
182
183
184
185
186
187
188
private final class LazyClassPathLookupIterator <T> implements Iterator <Provider<T>> { static final String PREFIX = "META-INF/services/" ; Set<String> providerNames = new HashSet <>(); Enumeration<URL> configs; Iterator<String> pending; Provider<T> nextProvider; ServiceConfigurationError nextError; LazyClassPathLookupIterator() { } private int parseLine (URL u, BufferedReader r, int lc, Set<String> names) throws IOException { String ln = r.readLine(); if (ln == null ) { return -1 ; } int ci = ln.indexOf('#' ); if (ci >= 0 ) ln = ln.substring(0 , ci); ln = ln.trim(); int n = ln.length(); if (n != 0 ) { if ((ln.indexOf(' ' ) >= 0 ) || (ln.indexOf('\t' ) >= 0 )) fail(service, u, lc, "Illegal configuration-file syntax" ); int cp = ln.codePointAt(0 ); if (!Character.isJavaIdentifierStart(cp)) fail(service, u, lc, "Illegal provider-class name: " + ln); int start = Character.charCount(cp); for (int i = start; i < n; i += Character.charCount(cp)) { cp = ln.codePointAt(i); if (!Character.isJavaIdentifierPart(cp) && (cp != '.' )) fail(service, u, lc, "Illegal provider-class name: " + ln); } if (providerNames.add(ln)) { names.add(ln); } } return lc + 1 ; } private Iterator<String> parse (URL u) { Set<String> names = new LinkedHashSet <>(); try { URLConnection uc = u.openConnection(); uc.setUseCaches(false ); try (InputStream in = uc.getInputStream(); BufferedReader r = new BufferedReader (new InputStreamReader (in, UTF_8.INSTANCE))) { int lc = 1 ; while ((lc = parseLine(u, r, lc, names)) >= 0 ); } } catch (IOException x) { fail(service, "Error accessing configuration file" , x); } return names.iterator(); } private Class<?> nextProviderClass() { if (configs == null ) { try { String fullName = PREFIX + service.getName(); if (loader == null ) { configs = ClassLoader.getSystemResources(fullName); } else if (loader == ClassLoaders.platformClassLoader()) { if (BootLoader.hasClassPath()) { configs = BootLoader.findResources(fullName); } else { configs = Collections.emptyEnumeration(); } } else { configs = loader.getResources(fullName); } } catch (IOException x) { fail(service, "Error locating configuration files" , x); } } while ((pending == null ) || !pending.hasNext()) { if (!configs.hasMoreElements()) { return null ; } pending = parse(configs.nextElement()); } String cn = pending.next(); try { return Class.forName(cn, false , loader); } catch (ClassNotFoundException x) { fail(service, "Provider " + cn + " not found" ); return null ; } } @SuppressWarnings("unchecked") private boolean hasNextService () { while (nextProvider == null && nextError == null ) { try { Class<?> clazz = nextProviderClass(); if (clazz == null ) return false ; if (clazz.getModule().isNamed()) { continue ; } if (service.isAssignableFrom(clazz)) { Class<? extends S > type = (Class<? extends S >) clazz; Constructor<? extends S > ctor = (Constructor<? extends S >)getConstructor(clazz); ProviderImpl<S> p = new ProviderImpl <S>(service, type, ctor, acc); nextProvider = (ProviderImpl<T>) p; } else { fail(service, clazz.getName() + " not a subtype" ); } } catch (ServiceConfigurationError e) { nextError = e; } } return true ; } private Provider<T> nextService () { if (!hasNextService()) throw new NoSuchElementException (); Provider<T> provider = nextProvider; if (provider != null ) { nextProvider = null ; return provider; } else { ServiceConfigurationError e = nextError; assert e != null ; nextError = null ; throw e; } } @SuppressWarnings("removal") @Override public boolean hasNext () { if (acc == null ) { return hasNextService(); } else { PrivilegedAction<Boolean> action = new PrivilegedAction <>() { public Boolean run () { return hasNextService(); } }; return AccessController.doPrivileged(action, acc); } } @SuppressWarnings("removal") @Override public Provider<T> next () { if (acc == null ) { return nextService(); } else { PrivilegedAction<Provider<T>> action = new PrivilegedAction <>() { public Provider<T> run () { return nextService(); } }; return AccessController.doPrivileged(action, acc); } } }
二、SpringBoot的自动装配机制 2.1 自动装配核心原理 SpringBoot 的自动装配(Auto-Configuration)是其“约定优于配置”理念的核心体现。它的目标是springboot启动时,根据项目中引入的依赖和配置,自动注册相应的 Bean 到 Spring 容器中,从而减少开发者的手动配置。
自动装配的核心流程如下:
启动类注解 @SpringBootApplication @EnableAutoConfiguration,用于开启自动配置。@EnableAutoConfiguration 注解@Import 导入了 AutoConfigurationImportSelector 类,该类负责加载所有符合条件的自动配置类。spring.factories(2.x)或 AutoConfiguration.imports(3.x)条件注解(如 @ConditionalOnClass、@ConditionalOnBean)
2.2 springboot2.x和3.x的自动配置文件的差异
版本
配置文件路径
文件格式
SpringBoot 2.x
META-INF/spring.factoriesProperties 格式
SpringBoot 3.x
META-INF/spring/org.springframework.boot.autoconfigure.AutoConfiguration.imports文本格式(每行一个类)
示例:
2.3 与SPI机制的关系 SpringBoot 的自动装配机制本质上是 SPI 思想在 Spring 框架中的实现 :
SPI 机制 :Java 通过 META-INF/services/ 目录下的文件来声明接口的实现类 。SpringBoot 自动装配 :通过 META-INF/spring.factories(2.x)或 META-INF/spring/AutoConfiguration.imports(3.x)来声明自动配置类 (不需要实现接口)。
两者都是通过外部配置文件 来解耦接口(或配置)与实现,实现插拔式的扩展机制。
2.4 核心源码解析 SpringBoot自动装配的原理主要依赖于他的@SpringApplication注解,该注解内部包含了@EnableAutoConfiguration注解,这个注解内部又包含了@Import注解,携带AutoConfigurationImportSelector.class这个参数。
1 @Import({AutoConfigurationImportSelector.class})
在spring启动时,扫描到启动类包含了@Import注解,于是就将这个自动配置选择器类注册到spring容器当中。
1 2 3 public class AutoConfigurationImportSelector implements DeferredImportSelector , BeanClassLoaderAware, ResourceLoaderAware, BeanFactoryAware, EnvironmentAware, Ordered{}public interface DeferredImportSelector extends ImportSelector {}
因为AutoConfigurationImportSelector实现了DeferredImportSelector接口,这个接口又实现了ImportSelector。所以在spring在这个选择器类注册到容器之后,就会调用他的selectImports方法,负责获取所有要自动配置的类的全类名。而这,正是自动装配的开始 。
源码:
selectImports
1 2 3 4 5 6 7 8 9 10 11 12 public String[] selectImports(AnnotationMetadata annotationMetadata) { if (!this .isEnabled(annotationMetadata)) { return NO_IMPORTS; } else { AutoConfigurationEntry autoConfigurationEntry = this .getAutoConfigurationEntry(annotationMetadata); return StringUtils.toStringArray(autoConfigurationEntry.getConfigurations()); } }
isEnabled
1 2 3 4 5 6 protected boolean isEnabled (AnnotationMetadata metadata) { return this .getClass() == AutoConfigurationImportSelector.class ? (Boolean)this .getEnvironment().getProperty("spring.boot.enableautoconfiguration" , Boolean.class, true ) : true ; }
getAutoConfigurationEntry
1 2 3 4 5 6 7 8 9 10 11 12 13 14 15 16 17 18 19 20 21 22 23 24 25 26 protected AutoConfigurationEntry getAutoConfigurationEntry (AnnotationMetadata annotationMetadata) { if (!this .isEnabled(annotationMetadata)) { return EMPTY_ENTRY; } else { AnnotationAttributes attributes = this .getAttributes(annotationMetadata); List<String> configurations = this .getCandidateConfigurations(annotationMetadata, attributes); configurations = this .<String>removeDuplicates(configurations); Set<String> exclusions = this .getExclusions(annotationMetadata, attributes); this .checkExcludedClasses(configurations, exclusions); configurations.removeAll(exclusions); configurations = this .getConfigurationClassFilter().filter(configurations); this .fireAutoConfigurationImportEvents(configurations, exclusions); return new AutoConfigurationEntry (configurations, exclusions); } }
fireAutoConfigurationImportEvents
1 2 3 4 5 6 7 8 9 10 11 12 13 14 15 16 17 private void fireAutoConfigurationImportEvents (List<String> configurations, Set<String> exclusions) { List<AutoConfigurationImportListener> listeners = this .getAutoConfigurationImportListeners(); if (!listeners.isEmpty()) { AutoConfigurationImportEvent event = new AutoConfigurationImportEvent (this , configurations, exclusions); for (AutoConfigurationImportListener listener : listeners) { this .invokeAwareMethods(listener); listener.onAutoConfigurationImportEvent(event); } } }
invokeAwareMethods
1 2 3 4 5 6 7 8 9 10 11 12 13 14 15 16 17 18 19 20 21 22 23 24 25 26 27 28 29 30 private void invokeAwareMethods (Object instance) { if (instance instanceof Aware) { if (instance instanceof BeanClassLoaderAware) { BeanClassLoaderAware beanClassLoaderAwareInstance = (BeanClassLoaderAware)instance; beanClassLoaderAwareInstance.setBeanClassLoader(this .beanClassLoader); } if (instance instanceof BeanFactoryAware) { BeanFactoryAware beanFactoryAwareInstance = (BeanFactoryAware)instance; beanFactoryAwareInstance.setBeanFactory(this .beanFactory); } if (instance instanceof EnvironmentAware) { EnvironmentAware environmentAwareInstance = (EnvironmentAware)instance; environmentAwareInstance.setEnvironment(this .environment); } if (instance instanceof ResourceLoaderAware) { ResourceLoaderAware resourceLoaderAwareInstance = (ResourceLoaderAware)instance; resourceLoaderAwareInstance.setResourceLoader(this .resourceLoader); } } }
在获取到所有自动配置的类的集合之后,spring容器内部会按序将它们注册到IOC容器中。
强烈建议,自己手动去看源码,收获蛮多的!!!
三、自定义Starter开发实战 3.1 创建jar包 首先创建一个maven的空项目,然后编写要注入到spring容器中的类,这里我使用的是一个接口和对应的实现类,当然也可以不需要接口。
1
2
3
4
5
6
7
8
9
10
11
public interface LdyService { public void handle () ; } public class LdyServiceImpl implements LdyService { @Override public void handle () { System.out.println("我是" +this .getClass().getName()); } }
然后,如果你要使用的springboot版本是2.x,则在resources目录下创建**/META-INF/spring.facotries**文件,写入如下内容(自动配置类注解的全类名下写上要自动配置的类的全类名)
1
2
org.springframework.boot.autoconfigure.EnableAutoConfiguration=\ com.ldy.config.LdyAutoConfiguration
如果springboot版本是3.x,则在resources目录下创建**/META-INF/spring/org.springframework.boot.autoconfigure.AutoConfiguration.imports**文件,直接写入要自动配置的类的全类名
1 com.ldy.service.impl.LdyServiceImpl
最后,使用maven插件进行打包,即clean+package。将target文件夹下生成的jar包,放入到springboot项目使用的maven仓库文件夹中,项目目录的创建依据jar包的pom.xml文件的配置进行创建
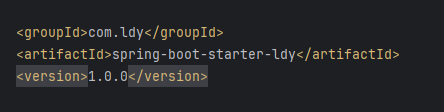
例如,根据上图,我需要在maven仓库中创建com\ldy\spring-boot-starter-ldy\1.0.0 这四级目录,将jar包放入到该目录中即可
3.2 使用jar包 随便(注意,maven仓库要一致)打开一个springboot工程项目,然后配置依赖并刷新
1
2
3
4
5
6
<!-- 自定义starter依赖 --> <dependency> <groupId>com.ldy</groupId> <artifactId>spring-boot-starter-ldy</artifactId> <version>1.0.0</version> </dependency>
在一个Controller中注入并使用我们的这个自定义类
1
2
3
4
5
6
7
8
9
10
11
@RestController @RequestMapping("/learn") public class LearnController { @Autowired LdyService ldyService; @GetMapping() public String get () { ldyService.handle(); return "ok" ; } }
然后,访问对应接口(例如:localhost:8080/learn),即可发现,成功的执行handle方法并在控制台打印对应信息
1 我是com.ldy.service.impl.LdyServiceImpl
以上,最简单的springboot启动器依赖就完成了,怎么样,是不是非常简单?😊
但是,如果我们想要引入其他依赖来完成这个starter,比如我们希望在starter里编写一个Controller,然后springboot项目启动就可以访问这个Controller接口(类似插件化实现),又该怎么做呢?做的时候会不会出现例如接口冲突、依赖冲突等问题呢?
让我们继续看下去
3.3 功能增强 要在starter里开发Controller接口,我们必然要引入spring相关的依赖包来使用对应的注解。
如下所示
1 2 3 4 5 6 7 8 9 10 11 12 13 14 15 16 <dependencies > <dependency > <groupId > org.springframework</groupId > <artifactId > spring-context</artifactId > <version > 6.1.14</version > </dependency > <dependency > <groupId > org.springframework</groupId > <artifactId > spring-webmvc</artifactId > <version > 6.1.14</version > </dependency > </dependencies >
然后创建一个Controller类并配置
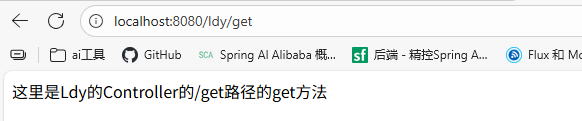
1
2
3
4
5
6
7
8
@RestController @RequestMapping("/ldy") public class LdyController { @GetMapping("/get") public String get () { return "这里是Ldy的Controller的/get路径的get方法" ; } }
将该Controller的全类名根据springboot项目的版本,配置到对应的配置文件中
重新打包并更换jar包,然后重新启动springboot应用,发现可以成功访问localhost:8080/ldy/get接口
最后,解答一些自己考虑过的问题:
1.spring-context、spring-webmvc等依赖的版本要和springboot项目的依赖版本一致吗?
答:不需要,但是需要特别注意版本差异。引入自定义starter之后,Maven根据就近定义原则,会选择最近的依赖版本,如果主项目已经声明了依赖,则会优先使用主项目的版本。如果starter的依赖版本和主项目的依赖版本差不多,或者使用到的api之间没什么变化(比如包名相同,使用的方法都存在),那么运行时是不会出错的。
这也解释了为什么很多依赖包都会有springboot 的版本或者jdk 版本的要求。像springaiAlibaba必须要求springboot版本是3.x,就是因为版本不兼容,很多使用到的api跟2.x版本不一样。